Quick Start
From zero to your first QA scan in under 10 minutes. This guide walks through connecting a Shopify store, adding a development theme, mapping templates, and running a screenshot scan.
Step 1 — Create your account
Go to app.themesync.dev and sign in with Google or an email address. No separate registration step — your account is created on first sign-in.
Screenshot needed: Login page showing Google and email sign-in options.
Step 2 — Connect a store
After signing in you'll land on the store home — empty for now. Click Connect a store and enter your Shopify store URL (e.g. my-store.myshopify.com).
Click "Connect a store"
In the new theme modal, select Shopify as the platform and enter your store URL.
Add a Theme Access password (recommended)
Install the free Theme Access app from the Shopify App Store on your client's store, generate a password, and paste it here. This lets ThemeSync run without manual browser authentication — the dev server stays up indefinitely.
Add an Admin API token (optional but useful)
Create a Custom App in your Shopify Admin with read access to products, collections, pages, and themes. Paste the token in Store Settings. This powers template mapping autocomplete and the Import from Store flow.
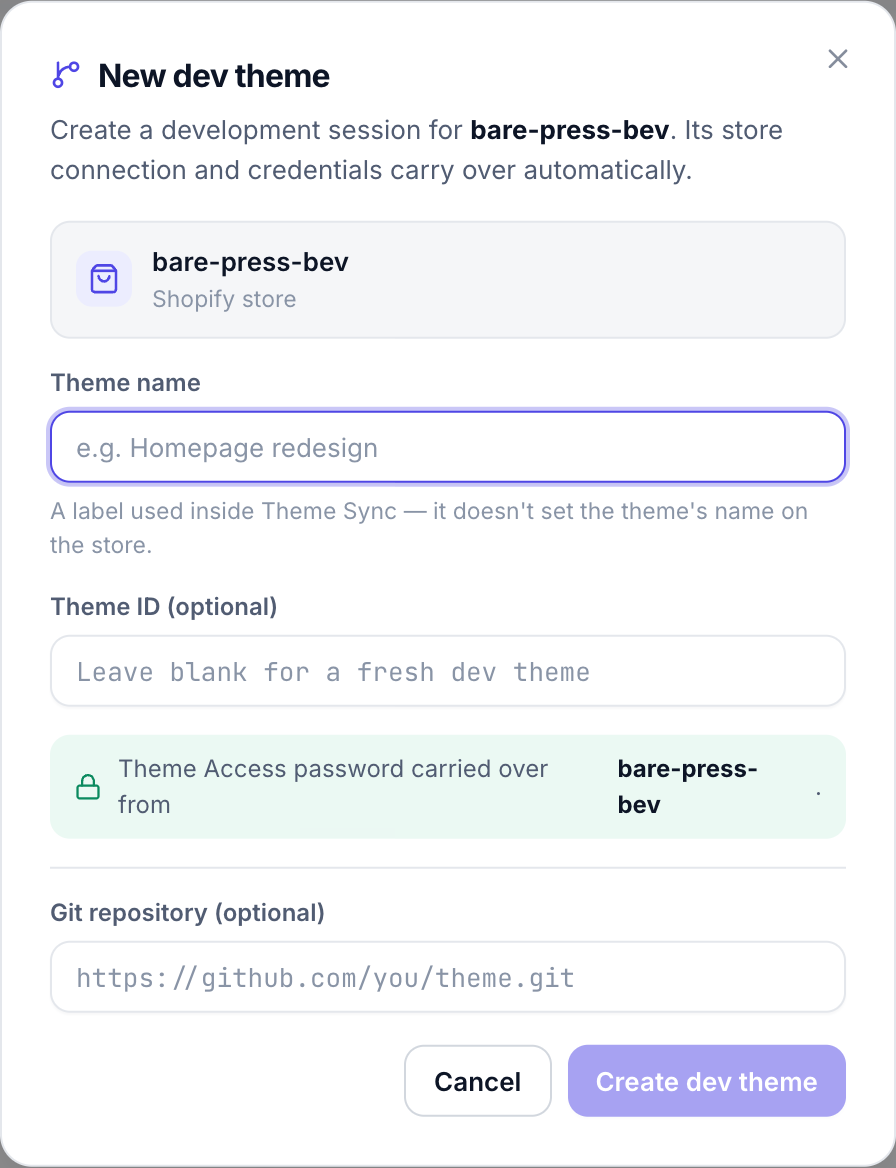
Step 3 — Add a development theme
With the store connected, click Add Theme → New development theme. Give it a name (usually the branch or feature you're working on).
Name the theme
Use a descriptive name — e.g. feature/new-homepage or redesign-v2. This shows in the store home and is part of the URL.
Connect a git repo (optional)
Paste a HTTPS git URL and a Personal Access Token. ThemeSync will clone the repo and auto-pull changes on your chosen interval (default: 1 minute).
Create the theme
ThemeSync clones your repo, runs shopify theme dev in the cloud, and returns a Preview URL and Editor URL within about 30 seconds.
Once the dev server is running, open the Preview URL — you should see your theme on the live store. Share this link with your client any time; they won't see any of your code.
Step 4 — Map your templates
Go to the Templates tab. ThemeSync auto-detects your Liquid template files. For each one, assign a real store URL so QA screenshots know which page to capture.
Open the Templates tab
Click Templates in the left sidebar while inside your theme.
Assign URLs
For each template (Homepage, Product, Collection, etc.) pick a URL from the dropdown. If you added an Admin API token, ThemeSync shows your real products and pages as options.
Add custom URLs (optional)
Add any extra pages — cart, search, 404 — that aren't auto-detected from templates.
Step 5 — Run your first QA scan
Go to the QA & Screenshots tab. Select pages, pick devices and a browser, then click Capture.
Select pages
Check the pages you want to capture — your mapped templates appear here automatically.
Choose devices
Start with Desktop + iPhone 14 for a quick check. All 5 device presets for a full pre-launch audit.
Pick a browser
Chromium is the fastest default. Add Safari (WebKit) to catch iOS-specific rendering issues.
Capture & review
ThemeSync takes full-page screenshots (including lazy-loaded images). Review the grid, approve pages that look good, or flag issues.
Screenshot needed: QA tab showing a completed screenshot grid — multiple pages × devices, with approval badges.
Step 6 — Share a feedback link
Go to the Feedback tab and create a feedback session. Set an expiry (e.g. 7 days), copy the link, and send it to your client.
Your client opens the link and sees your dev theme on their store. A lightweight toolbar appears — they click anywhere on the page to drop a pin and leave a comment. No login required.
Step 7 — Invite your team (optional)
Go to Team (workspace settings, gear icon bottom-left). Enter a team member's email, choose their role (Designer, QA, or PM), and share the invite link.
Once they join, each person can sign off on pages within their role. A page is "done" when Designer + QA + PM + Client have all approved at every viewport.